Share:
Want to plant a tree, but short on time or patience? Below is an illustrated guide summarizing the basic principles of planting preparation, the planting process itself, and a brief overview of caring for the tree after placing it in the ground.
These instructions were written to minimize as much as possible the stress on the newly purchased tree during the sensitive transition period from the nursery to its new location. Strictly following each of the steps properly will ensure optimal establishment conditions for the tree, as well as enjoyment and peace of mind from your tree for years to come.
The nursery will provide a warranty for supplied trees only if the planting instructions detailed in the full guide» are strictly followed!
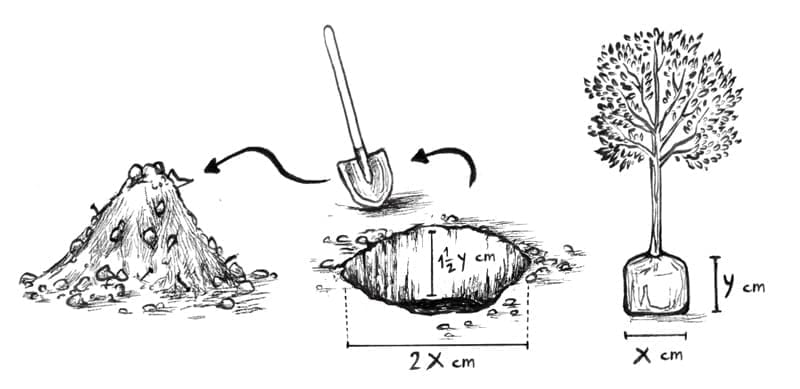
Digging the Hole:
Dig a hole 1.5-2 times wider than the root ball width (X), and 1.5-2 times deeper than the root ball height (Y).
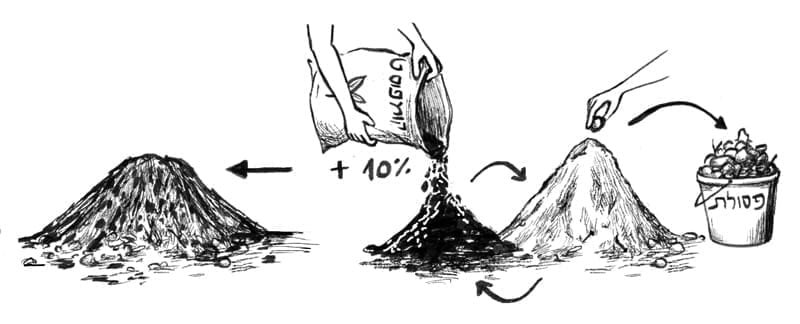
Soil Preparation:
Clear the soil of debris. Add 10-20% compost or humus and mix.
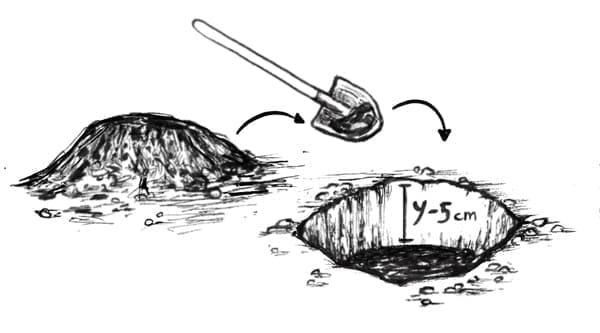
Backfilling the Hole:
Return clean, enriched soil until the hole depth is about 5 cm less than the root ball height (Y).
Additional Preparations:
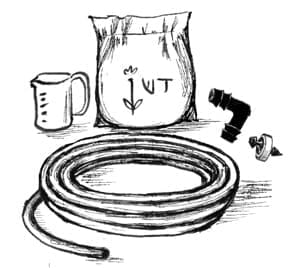
Prepare irrigation and fertilization equipment.
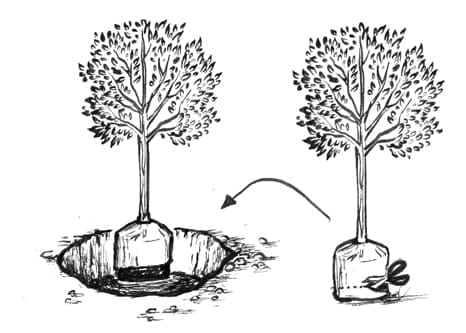
Cutting the Bag:
Cut and remove the bottom of the planting bag only, and place the root ball into the hole.
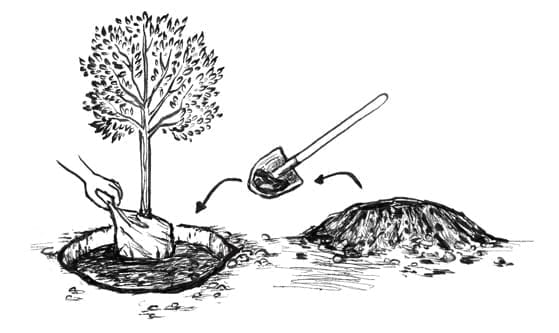
Filling the Hole:
Add soil up to half the height of the planting bag. Then, pull out the remainder of the bag.
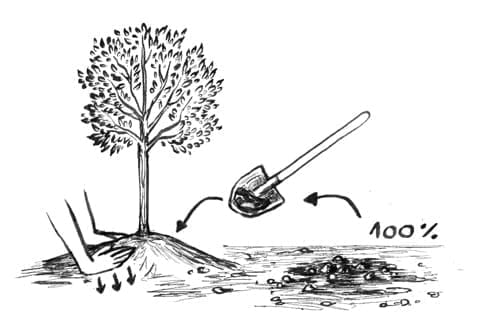
Completing the Planting:
Fill the hole with the remaining soil, cover, and tamp down. At the end, make sure the root collar is visible (positioned slightly above ground level).
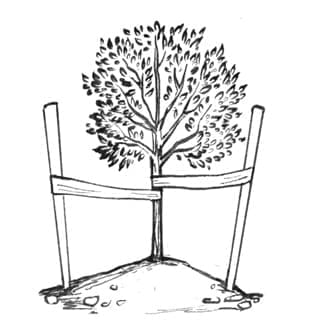
Tree Stabilization:
Place 2-3 stakes (as needed).
Tying Method:
Tie the tree using a wide, flexible strap. Caution: avoid overtightening, which can cause girdling/strangulation.
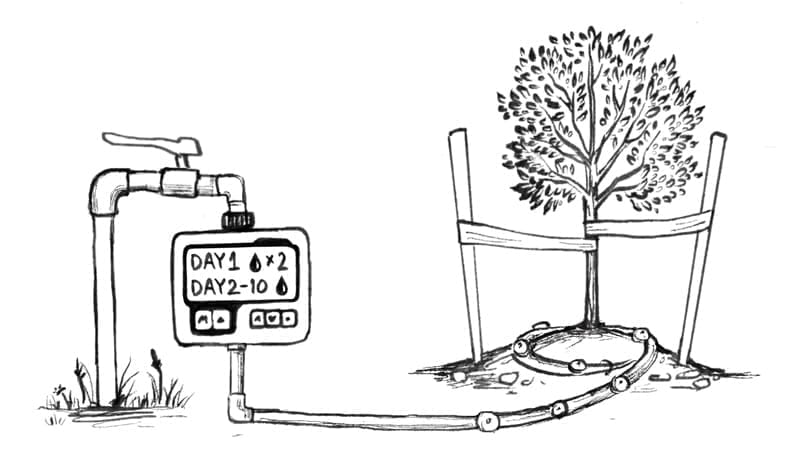
Irrigation:
Immediately after planting, apply a double ration of water. During the initial establishment days (first 5-10 days), water daily. After establishment, water according to the quantity table based on tree size and season.
Stage and Time | Recommended Frequency – Light/Sandy Soil | Recommended Frequency – Heavy/Clay Soil | Important Highlights |
|---|---|---|---|
Establishment Stage:
First 10 days in summer
First 3–5 days in winter (weather dependent) | Daily – Mandatory! | Daily – Mandatory! | |
Year 1 – Summer | 3–4 times a week | 2–3 times a week | Begin spacing out waterings |
Year 1 – Winter | 2–3 times a week | 1–2 times a week | Stop or reduce during rainfall |
Years 2–5 – Summer | 2–3 times a week | 1–2 times a week | Increase ration volume as the tree grows |
Years 2–5 – Winter | 1–2 times a week | Once a week or weather dependent | Deep waterings to saturate the deep root system |
Irrigation Frequency by Season and Growth Stage: Recommended Irrigation Volumes per Application
Golden Rule for Soil Irrigation – do not split the watering ration into multiple waterings. You must ensure long irrigations that reach deep down, saturate the entire root zone, and allow flushing of excess salts. The volume per irrigation unit (ration) remains fixed, determined by tree size. Only the irrigation frequency changes based on the season and stage of establishment.
In containerized media (soilless substrate), adjust irrigation frequency based on substrate composition and volume (it may be necessary to increase the application frequency to 2 waterings a day).
Irrigation Controller Programming Example:
If you installed 4 drippers of 8 liters/hour around the tree (total 32 liters per hour), set the controller to 1 hour of run time to achieve a ration suitable for a medium tree (about 30-45 liters per ration). Ensure water pressure in the garden is normal: place a bowl under one of the drippers, run the irrigation system for 5 minutes, and then measure the water volume in the bowl – for an 8 liter/hour dripper, you should get about 650 ml. If the resulting volume is lower than this, consult a qualified professional to resolve the issue (for example, if a pressure booster is required).
Soil Types / Substrates
Light Soil:
Sandy or hamra soil, where water retention is low. Water drains quickly and does not accumulate near the roots. This soil tends to be low in nutrients, so fertilize and add organic matter.
Heavy Soil:
Soil with high water retention. It may be rich in nutrients, but is characterized by a clayey, dense structure, and can be problematic in terms of drainage and root aeration. In heavy soil, calculate and adjust waterings to avoid two extreme ends – a situation where the soil is waterlogged and roots lack oxygen, and the opposite situation where the soil dries out excessively, cracks, and then struggles to absorb irrigation water.
Perlite:
A substrate with excellent aeration capacity; its water retention depends on particle size. Used as an additive to heavy soil or in containerized media to improve drainage and root zone aeration.
Tuff (Volcanic Rock):
A substrate with a porous structure, allowing relatively high water retention and long-term stability. Contributes to aeration and drainage improvement. Recommended for addition to heavy soil to break up density and improve structure.
Please Note! In containerized media in general, and in perlite and tuff in particular, the tree’s “margin of error” for irrigation mishaps is significantly smaller, increasing the risk of tree desiccation and damage. Using a substrate made of a high percentage of perlite or tuff requires more frequent watering, sometimes even twice a day, depending on the type of perlite/tuff (smaller particles hold more water).
Please Note: Soil mulch of any kind (wood chips, prunings, tuff, pebbles, etc.) traps moisture in the soil, prevents evaporation of excess water, and leads to a high likelihood of fatal root rot. Do not use soil mulch of any kind during the first two years after planting.
Please Note: Soil mulch of any kind (wood chips, prunings, tuff, pebbles, etc.) traps moisture in the soil, prevents evaporation of excess water, and leads to a high likelihood of fatal root rot. Do not use soil mulch of any kind during the first two years after planting.
עץ יחיד:
מסנן ומטהר כ-1000 מ”ק אוויר מזיהום
מייצר 700 ק”ג חמצן
קולט מעל 20 טון של פחמן דו חמצני
מסוגל לספוג כ-20 ק”ג אבק בכל שנה
ולבלוע תרחיפים המכילים מתכות רעילות, כמו כספית, עופרת וליתיום
חלק מהחמצן באוויר שאנו נושמים מיוצר על ידי העצים
העצים מכינים עצמם לחורף, שבו פעילותם נעצרת. כדי לא להינזק מפגעי הקור מפחיתים העצים את שטח הפנים, ע”י השלת העלים, כצעד הסתגלותי המאפשר להם לשרוד בתנאי החורף המקשים. הקולטנים שבעלים, הרגישים לטמפ’ היורדת, מפסיקים את ייצור הכלורופיל, הכלורופיל הקיים מתפרק והצבענים האחרים שבעלים נחשפים, והעלים הופכים מירוקים לצהובים, כתומים ואפילו אדומים.
בעת שלכת הסתיו, צבעי השלכת – בעיקר האדום – מאפשרים לעלה להישאר מעט יותר על העץ וכך העץ “שואב” את שארית החומרים המזינים מהעלים ולנצלם עד תום. צבעי שלכת ביערות שלא בעונת הסתיו מאפשרת ליערנים לאתר בעיות.
המלצות ואפשרויות לשילוב שקדים בתפריט היומי:
*תודה לגילי חדש – רפואה טבעית
הפרט המוכר הכי עתיק בעולם הוא עץ מזן Pinus longaeva המוכר בשמותיו העממיים Great Basin bristlecone pine או intermountain bristlecone pine או western bristlecone pine, שנמצא ביער Ancient Bristlecone Pine שב’הרים הלבנים’ בקליפורניה.
גילו מתקרב ל-5,100 שנים!
גם העץ השני בגילו המוכר נמצא באותו יער, והוא גם כן תת זן של אותו עץ. הוא בן יותר מ-4,800 שנה. תת זן זה קיבל מהחוקרים שמדדו את גילו את השם “מתושלח”
הפרט הכי גבוה בעולם הוא כפי הנראה עץ מזן
Sequoia sempervirens
שנמצא בפארק הלאומי רדווד בקליפורניה.
גובהו 115 מטר
גינקו דו אונתי מהווה מעין ‘מאובן חי’. הוא התקיים כבר בתקופות פרהיסטוריות.
בחפירות ארכיאולוגיות נמצאו חלקי מאובנים שלו מלפני 270 מליוני שנים!
עמידותו הרבה, והיכולת להזריע את עצמו בקלות, סייעו לו להתקיים לאורך הדורות. הוא כל כך עמיד, שפרטים בודדים שלו שרדו אפילו את פצצת האטום בהירושימה בשנת 1945, למרות שהיו במרחק קילומטר אחד או שניים בלבד ממוקד הפיצוץ. לא רק שעצים אלה שרדו, הם אףהחלימו לחלוטין לאחר זמן קצר יחסית.